|
Welcome to the webpage that tells you how to create templates to be able to print out verses on card inserts,
???????????????????? ?brought to you courtesy of our sponsors
???????????????? www.imag-e-nation.com The Home of Card Making
This was kindly supplied by Peejay for the free use of Verses4cards users. Peejay is an active member of the iSpace Card Making Community which regularly comes up with a host of tips, hints, ideas.
_________________________________________________________________
For example, do you know how to print verses in gold, silver or copper??....
...how to print verses on acetate?...
where to get free downloadable card inserts?...
....Find out by? CLICKING HERE
to visit the Tips and Techniques ?iSpace Community for this and much more... indeed... 300 hints, tips and cardmaking?nuggets of gold
_____________________________________________________________
?
From the ?File? menu select ?New? and open a blank document.
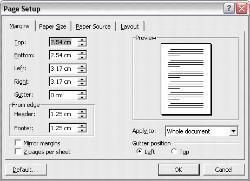
From the ?File? menu select ?Page Setup?.? A box should open up similar to this?
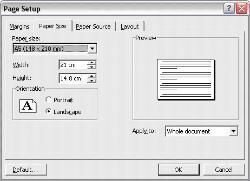
Click on the ?Paper size? tab and set the paper
size to A5 and Orientation to ?Landscape?.? Click OK.?
You should now have a screen showing a blank page of A5 in landscape format
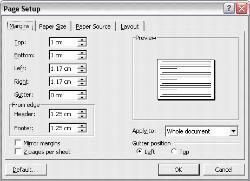
Once again go to ?Page Setup? from the ?File? menu
Click on the ?Margin? tab and set the margins as 1cm for top and bottom and 1.17cm for left and right (1.25cm from edge of header & footer). Click on OK.
This allows for the insert to be trimmed with fancy edge cutters/trimmers/scissors because you will usually find that a true A5 piece of paper, once printed and folded and placed inside the card, is actually a little too large and would benefit from a ?light? trim!!
You have now completed the first step and have the base to create your template.
The next stage is to create a ?Table?.? To do this go the ?Table? on the menu bar, select ?Insert? and ?Table? from the drop down menu.? You should get a box similar to this.
Change the ?Number of columns? to 3 and the ?Number of rows? to 1.? If you want to you can check ?Set as default for new tables?.? Useful if you intend making several different sizes of template and don?t use this facility for anything else.? Click OK
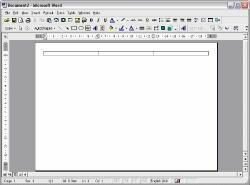
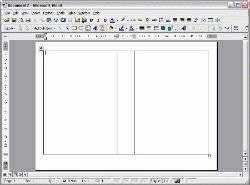
You should now have a screen looking
something like this?, which is the table you now need to work on.
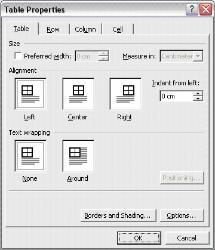
Highlight the first section of the table and either select ?Table Properties? from the ?Table? menu or right-click and select ?Table Properties? from the menu that appears.? You should get a box like this?.
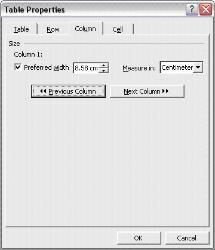 Click on ?Column? and change the width to 8.5cms.? Click ?Next column? and change that to 2cms.? Click ? Next Column? again and change that to 8.5cms to match the first column.? Click OK. Click on ?Column? and change the width to 8.5cms.? Click ?Next column? and change that to 2cms.? Click ? Next Column? again and change that to 8.5cms to match the first column.? Click OK.
 CLICK HERE??for more card making nuggets of gold?in?Imag-e-nation's ?iSpace Craft?Community CLICK HERE??for more card making nuggets of gold?in?Imag-e-nation's ?iSpace Craft?Community
(a collection of top tips & verses produced and/or sourced by the Forum users)
_______________________________________________________________
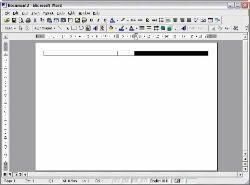 Your page should now look like this.... Your page should now look like this....
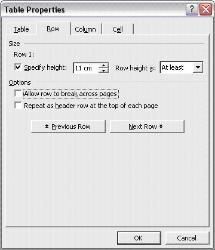
Now go back to ?Table Properties? and click on ?Row?.? Check ?Specify height? and make it 11cm with ?Row height? set to ?At least?.?? Make sure that nothing else is checked.? Click on OK
Your template (yes, nearly there!!) should now look something like this?.
 Now all you need to do is to tell each cell where you want to place any typing you do.? Now all you need to do is to tell each cell where you want to place any typing you do.?
The middle cell is obviously the middle of the card and is the area you use to stick down ? you don?t need to do anything more with this bit.
The left hand side I sometimes use to add a bit of clip art or writing and I generally have this side centred.?
The right hand side is where you put your verse.? I have this set to position from the top and then use the ?return? key to position it until I am happy.? I prefer my verse/text to be slightly high of centre so that it looks balanced, but that is all down to personal preference
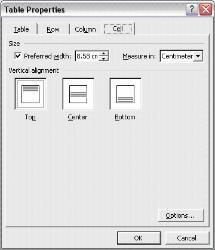 Anyway, to position the text, click in the cell you want to format and then you can either select ?Table Properties? the ?Cell? tab and click on your preference for top, centre or bottom and click OK or????? ???? you can right-click over the cell, select ?Cell Alignment? and then make your choice from the little box that shows to the side.Your cursor should now blink in the position that you have selected. Anyway, to position the text, click in the cell you want to format and then you can either select ?Table Properties? the ?Cell? tab and click on your preference for top, centre or bottom and click OK or????? ???? you can right-click over the cell, select ?Cell Alignment? and then make your choice from the little box that shows to the side.Your cursor should now blink in the position that you have selected.
So that the lines showing on your screen don?t print (unless you want them to) go to ?Format? and select ?Borders and Shading? from the drop down menu.? On the ?Borders? tab, select ?None? - click OK.? Your page will now either have very light grid lines or will be completely blank.?? Either way your cursor will blink in one of the cells and you can move it from one cell to another by clicking with the mouse or using the tab key.?? If your page is blank and would prefer to see lines as a guide but don?t want them to print, go to the ?Table? menu and select ?Show gridlines?.? These show on screen but will not print!!?The only thing left to do now is to save it as????.. a template!
______________________________________________________________________
See items?which you can buy?at Imag-e-nation for wholesale prices and sell on at retail prices
For example Imag-e-nation Acetate Peel Off Colouring pens are ?2.50 with free P&P HEREPrices on ebay vary but usually? are, with postage costs,??4.50 - ?5.50
____________________________________________________________________
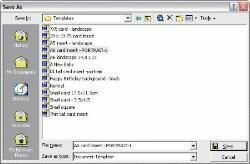
From the ?File? menu select ?Save as?.?? A ?Save As? box will come up.? Decide what you want to call the template and type this in ?File name? then select ?Document Template? from the selection offered in the ?Save as type:? box.? Click on ?Save?
You have?now completed your template!!
To access the template for use all you need to do is to open it from the ?File? menu, select ?New?
and then select your template from the choice presented to you under the general tab ? make
sure you select it to create a new document unless you want to use it to create a new template ?
in which case, select it as a template!!
You can do general inserts and save them as documents so you don?t have to type it out again
(ie.? Plain ?Happy Birthday?)
Once you have created this one you can go on to create more for different card sizes by just changing the measurements.? Obviously you have to have a card to measure and some scrap
paper (well I find I need scrap paper!!) to work out the different measurements needed for the
cells.
Tips:?
Always put the correct size of paper into the printer.? If your template is for an A6 card put a
piece of A5 paper into your printer, if I?st for an A5 card,? put A4 into the printer.? If it?s a non-standard (custom) size, cut your paper to that size.? If you don?t, the insert won?t print correctly.
Print off a sample before using expensive vellums or other paper, to make sure that everything
will fit the card and you?re happy with the layout.? You will probably only need to do this once if you keep the sample ? mark it with the file name you gave it and keep it in a file for future reference
|